
Ever since Apple released iOS 10 in 2016, it’s been possible to use the iPhone as a magnifying glass. You don’t need a separate magnifying glass app; this helpful magnifier feature is free! Of course, the screen magnifier is not only useful for those with visual challenges, but also for any of us who has ever needed a reading magnifier to see more detail in an image. Better yet, the screen magnifier includes a light, as well as the ability to adjust contrast and color, which is a big help for those with color blindness.
Feature Use iPhone as a magnifier glass is quick and easy to set up, and it’s useful for a wide variety of situations whether you have problems seeing or not. After you enable the magnifier, it’s never more than a simple shortcut away, no matter what you might be doing on your iPhone at any given time.
Enabling magnifier glass on iPhone
Hidden away in the Accessibility section of iOS is a very useful little feature that turns your iPhone into a magnifying glass. It does this by using the camera and a software tweak that zooms in on everything you point it at. It’s got a few tricks up its sleeves, too, such as the ability to adjust the colour of the display and how big everything will look on the screen.
Step 1: Open “Settings” on your iPhone.
Step 2: Choose “General“.
Step 3: Click “Accessibility“.
Step 4: Choose “Magnifier“.
Step 5: Toggle the option for Magnifier to “on“.
Step 6: You enable the “Auto-Brightness” feature too so you get the best lighting conditions while using the magnifier on your iPhone.
Now you have the magnifier enabled on your iPhone, so next we’ll talk about how to use it.
Use iPhone as a magnifier glass
Step 1: Quickly press your iPhone’s Side button three times if you have an iPhone X or later, or the Home button three times for earlier iPhone versions.
Step 2: If you have multiple Accessibility Shortcuts turned on, a menu will pop up. Click “Magnifier”.
Step 3: If not, the magnifying glass will automatically open. To maximize the view on your display, slide the yellow dot to the right, toward the plus sign. To minimize the view, slide to the left toward the minus symbol.
Step 4: You’re in the magnifier interface, you’ll notice it looks a lot like the Camera app’s interface, although it’s slightly different:
You’ll see there is a slider bar for adjusting the zoom, and you’ll also see there are buttons to toggle the rear-facing LED torch for visibility and locking the focus so you don’t lose your focal point while you examine something up close.
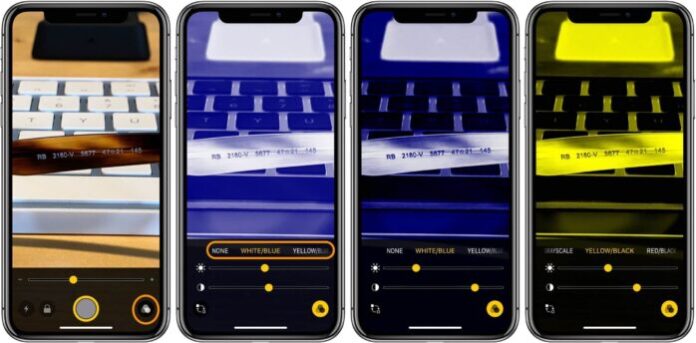
Step 5: At the bottom right is another button, which lets you apply filters to the magnifier.
Depending on what something is made out of, its color, or the lighting conditions filters can help improve visibility or enhance details. In addition, you can adjust the exposure and saturation separately with the two existing sliders, and you can even invert the colors in the image with the button at the bottom left. You can see some more tips and tricks when using iPhone at https://pagestart.com, wish you success!